PayKun Payment Gateway Integration in PHP
In this tutorial, We have share how to implement PayKun Payment Gateway Integration in PHP. PayKun payment gateway is a merchant service that authorizes credit/debit card or direct payments for e-businesses, online retailers and offline businesses. In brief Payment gateway fulfills the essential needs in the e-commerce transaction process & authorizing the payment between merchant and customer. We will also allow to download source code of live demo.
PayKun payment gateway features
- To Learn more #about the service of paykun
- Zero setup fee
- No Annual Maintenance charge
- Free Integration/Technical support (support major available integration)
- Flat 2% for all transaction made
- All day merchant support (On-All channel)
- 120+ payment option
- Payment link (accept payment over email/WhatsApp/SMS by sharing pay link)
- Provide Team Management Control over your staff(accessibility control of your employee/sale/support member)
- PCI compliance level 1 (highest validation/class-level security)
- Buyer/seller protection over vary metric
Before started to implement the PayKun Payment Gateway Integration in PHP look files structure:
- paykun-payment-gateway-integration-in-php
- css
- style.css
- images
- templates
- header.php
- footer.php
- config.php
- index.php
- request.php
- response.php
- css
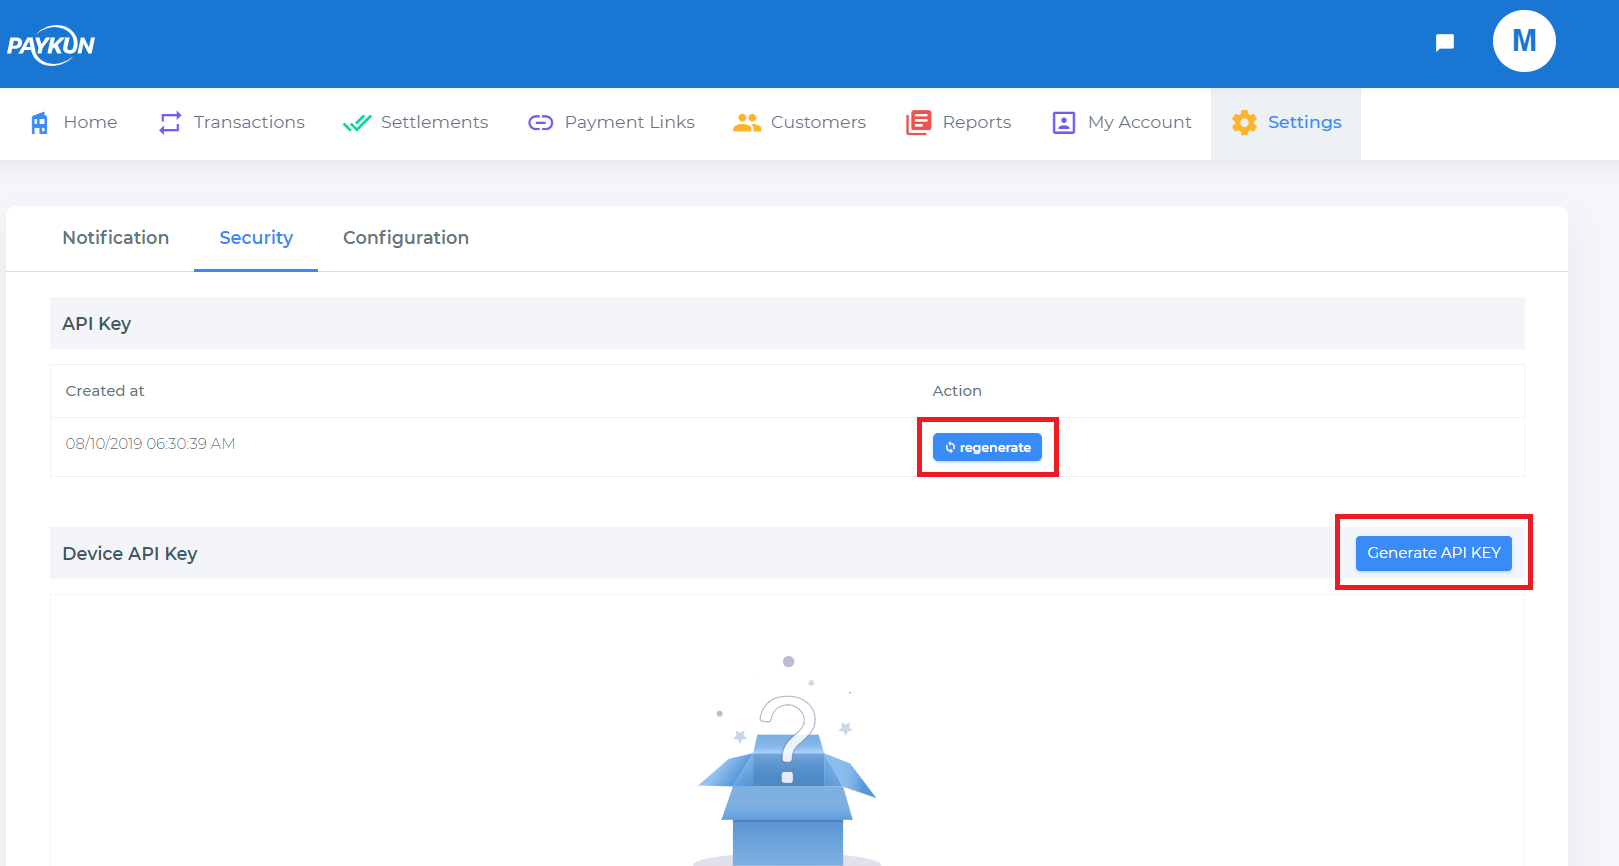
Step 1: Create a Account and configuration file
PayKun Credentials : MERCHANT ID, ACCESS TOKEN and ENCRYPTION KEY (Copy paste these credentials config.php)
|
1 2 3 4 5 6 7 8 9 10 |
<?php // vendor include('../vendor/autoload.php'); // PAYKUM_MERCHANT_ID define('PAYKUM_MERCHANT_ID', '1234567890'); // PAYKUM_ACCESS_TOKEN define('PAYKUM_ACCESS_TOKEN', 'XXXXXXXXXXXXXXXXXXXXXXXXXXXX'); // PAYKUM ENCRYPTION KEY define('PAYKUM_ENCRYPTION_KEY', 'XXXXXXXXXXXXXXXXXXXXXXXXXXXX'); ?> |
Step 2: Create a files named index.php and request.php
index.php
|
1 2 3 4 5 6 7 8 9 10 11 12 13 14 15 16 17 18 19 20 21 22 23 24 25 26 27 28 29 30 31 32 33 34 35 36 37 38 39 40 41 42 43 44 45 46 47 48 49 50 51 52 53 54 55 56 57 58 59 60 61 62 63 64 65 66 67 68 69 70 71 72 73 74 75 76 77 |
<?php include('templates/header.php');?> <section class="showcase"> <div class="container"> <div class="pb-2 mt-4 mb-2 border-bottom"> <h2>PayKun Payment Gateway Integration in PHP</h2> </div> <form method="POST" action="request.php"> <input type="hidden" name="response_url" value="response.php"> <div class="row align-items-center"> <div class="form-group col-md-6"> <label for="inputEmail4">Amount</label> <input type="text" name="amount" class="form-control" id="amt" value="10.00" readonly="readonly"/> </div> <div class="form-group col-md-6"> <label for="inputEmail4">Product Name</label> <input type="text" name="product_name" class="form-control" id="product-name" value="PROD 01" readonly="readonly" /> </div> </div> <div class="row align-items-center"> <div class="form-group col-md-6"> <label for="inputEmail4">Full Name</label> <input type="text" name="full_name" class="form-control" id="full-name" placeholder="Full Name" /> </div> <div class="form-group col-md-6"> <label for="inputEmail4">Email</label> <input type="text" name="email" class="form-control" id="email" placeholder="Email" /> </div> </div> <div class="row align-items-center"> <div class="form-group col-md-6"> <label for="inputEmail4">Contact No</label> <input type="text" name="contact" class="form-control" maxlength="10" id="contact" placeholder="Contact No" /> </div> <div class="form-group col-md-6"> <label for="inputEmail4">Address</label> <input type="text" name="address" class="form-control" id="address" placeholder="Address" /> </div> </div> <div class="row align-items-center"> <div class="form-group col-md-6"> <label for="inputEmail4">Country</label> <input type="text" name="country" class="form-control" maxlength="10" id="country" placeholder="country" value="india" /> </div> <div class="form-group col-md-6"> <label for="inputEmail4">State</label> <input type="text" name="state" class="form-control" id="state" placeholder="State" /> </div> </div> <div class="row align-items-center"> <div class="form-group col-md-6"> <label for="inputEmail4">City</label> <input type="text" name="city" class="form-control" maxlength="10" id="city" placeholder="City" /> </div> <div class="form-group col-md-6"> <label for="inputEmail4">Postal Code</label> <input type="text" name="postalcode" class="form-control" id="postalcode" placeholder="Postal Code" /> </div> </div> <div class="row align-items-center"> <div class="col"> <button type="submit" class="btn btn-primary mt-4 float-right">Submit</button> </div> </div> </form> </div> </section> <?php include('templates/footer.php');?> |
request.php
Note: Set true for production environment and false for sandbox or testing mode
For sandbox integration use:
$obj = new Payment(PAYKUM_MERCHANT_ID, PAYKUM_ACCESS_TOKEN, PAYKUM_ENCRYPTION_KEY, false, true);For live integration use:
$obj = new Payment(PAYKUM_MERCHANT_ID, PAYKUM_ACCESS_TOKEN, PAYKUM_ENCRYPTION_KEY, true, true);|
1 2 3 4 5 6 7 8 9 10 11 12 13 14 15 16 17 18 19 20 21 22 23 24 25 26 27 28 29 30 31 32 33 34 35 36 37 38 39 40 41 42 43 44 45 46 47 48 49 50 51 52 53 54 55 56 57 58 |
<?php include('config.php'); use Paykun\Checkout\Payment; $fname = $_POST['full_name']; $product_name = $_POST['product_name']; $email = $_POST['email']; $amount= $_POST['amount']; $contact = $_POST['contact']; $country = $_POST['country']; $state = $_POST['state']; $city = $_POST['city']; $postalcode = $_POST['postalcode']; $address = $_POST['address']; $response_url = $_POST['response_url']; /** * Parameters requires to initialize an object of Payment are as follow. * mid => Merchant Id provided by Paykun * accessToken => Access Token provided by Paykun * encKey => Encryption provided by Paykun * isLive => Set true for production environment and false for sandbox or testing mode * isCustomTemplate => Set true for non composer projects, will disable twig template */ $obj = new Payment(PAYKUM_MERCHANT_ID, PAYKUM_ACCESS_TOKEN, PAYKUM_ENCRYPTION_KEY, false, true); $successUrl = $response_url; $failUrl = $response_url; // Initializing Order $obj->initOrder(generateByMicrotime(), $product_name, $amount, $successUrl, $failUrl); // Add Customer $obj->addCustomer($fname, $email, $contact); // Add Shipping address $obj->addShippingAddress('india', $state, $city, $postalcode, $address); // Add Billing Address $obj->addBillingAddress('india', $state, $city, $postalcode, $address); //Enable if require custom fields $obj->setCustomFields(array('udf_1' => 'Test 1', 'udf_2' => 'Test 2', 'udf_3' => 'Test 3', 'udf_4' => 'Test 4', 'udf_5' => 'Test ')); //Render template and submit the form echo $obj->submit(); /* Check for transaction status * Once your success or failed url called then create an instance of Payment same as above and then call getTransactionInfo like below * $obj = new Payment('merchantUId', 'accessToken', 'encryptionKey', true, true); //Second last false if sandbox mode * $transactionData = $obj->getTransactionInfo(Get payment-id from the success or failed url); * Process $transactionData as per your requirement * * */ function generateByMicrotime() { $microtime = str_replace('.', '', microtime(true)); return (substr($microtime, 0, 14)); } ?> |
Step 3: Create a file named response.php
if Payment process done success/failure.
|
1 2 3 4 5 6 7 8 9 10 11 12 13 14 15 16 17 18 19 20 21 22 23 24 25 26 27 28 29 30 31 32 33 34 35 36 37 38 39 40 41 |
<?php include('config.php'); use Paykun\Checkout\Payment; $obj = new Payment(PAYKUM_MERCHANT_ID, PAYKUM_ACCESS_TOKEN, PAYKUM_ENCRYPTION_KEY, false, true); $response = $obj->getTransactionInfo($_REQUEST['payment-id']); $msg = ''; if(is_array($response) && !empty($response)) { if($response['status'] && $response['data']['transaction']['status'] == "Success") { $msg = '<div class="alert alert-success" role="alert">Transaction Successful</div>'; } else { //tampered or failed $msg = '<div class="alert alert-danger" role="alert">Transaction failed</div>'; } } ?> <?php include('templates/header.php');?> <section class="showcase"> <div class="container"> <div class="pb-2 mt-4 mb-2 border-bottom"> <h2>PayKun Payment Gateway Integration in PHP</h2> </div> <div class="text-center"> <h1 class="display-3">Thank You!</h1> <h3><?php print $msg;?></h3> <p class="lead"><strong>Please check your email</strong> for further instructions on how to complete your account setup.</p> <hr> <p> Having trouble? <a href="mailto:info@webhaunt.com">Contact us</a> </p> <p class="lead"> <a class="btn btn-primary btn-sm" href="http://localhost/wh/manage-subscription-payments-using-stripe-billing-in-php" role="button">Continue to homepage</a> </p> </div> </div> </section> <?php include('templates/footer.php');?> |
Step 4: Create header (header.php)
This view contains the header section of the webpage. The Bootstrap library is used to provide a better UI, so, include it in the header section.
Located at the top of a website, the header typically contains elements that include a company’s logo, website navigation, and contact information.
|
1 2 3 4 5 6 7 8 9 10 11 12 13 14 15 16 17 18 19 20 21 22 23 24 25 26 27 28 29 30 31 32 33 34 35 36 37 38 39 40 41 42 43 |
<!DOCTYPE html> <html lang="en"> <head> <link rel="canonical" href="https://www.codersmag.com/" /> <meta name="author" content="CodersMag"> <meta charset="utf-8"> <meta name="viewport" content="width=device-width, initial-scale=1, shrink-to-fit=no"> <meta name="description" content=""> <meta name="author" content=""> <link rel="icon" type="image/ico" href="https://codersmag.com/demos/ci/assets/images/favicon.ico"> <title>Load more data on page scroll using jQuery, Ajax and PHP | Coders Mag</title> <!-- Bootstrap core CSS --> <link rel="stylesheet" href="https://cdnjs.cloudflare.com/ajax/libs/twitter-bootstrap/4.3.1/css/bootstrap.min.css" /> <!-- Custom fonts for this template --> <link rel="stylesheet" href="https://cdnjs.cloudflare.com/ajax/libs/font-awesome/5.7.2/css/all.min.css" /> <link rel="stylesheet" href="https://cdnjs.cloudflare.com/ajax/libs/simple-line-icons/2.4.1/css/simple-line-icons.css" /> <link href="https://fonts.googleapis.com/css?family=Lato:300,400,700,300italic,400italic,700italic" rel="stylesheet" type="text/css"> <!-- Custom styles for this template --> <link href="css/style.css" rel="stylesheet"> <link href="css/shimmer.css" rel="stylesheet"> </head> <body> <!-- Navigation --> <nav class="navbar navbar-expand-lg navbar-dark bg-dark static-top header-bg-dark" style="background: ##FFFFFF!;"> <div class="container"> <a class="navbar-brand font-weight-bold" href="https://codersmag.com/"><h1>Coders Mag</h1></a> <button class="navbar-toggler" type="button" data-toggle="collapse" data-target="#navbarResponsive" aria-controls="navbarResponsive" aria-expanded="false" aria-label="Toggle navigation"> <span class="navbar-toggler-icon"></span> </button> <div class="collapse navbar-collapse" id="navbarResponsive"> <ul class="navbar-nav ml-auto"> <li class="nav-item active"> <a class="nav-link" href="https://codersmag.com/">Home <span class="sr-only">(current)</span> </a> </li> <li class="nav-item"> <a class="nav-link" href="https://codersmag.com/php-script-demos/">LIVE DEMO</a> </li> </ul> </div> </div> </nav> |
Step 5: Create a view file named footer.php
This view contains the footer section of the webpage.
- jQuery – needed by Bootstrap JavaScript.
- Bootstrap JavaScript – to make cool UI
|
1 2 3 4 5 6 7 8 9 10 11 12 13 14 15 16 17 18 19 20 21 22 23 24 25 26 27 28 29 30 31 32 33 34 35 36 37 38 39 40 41 42 43 44 45 46 47 48 49 50 51 |
<!-- Footer --> <footer class="footer bg-light footer-bg-dark"> <div class="container"> <div class="row"> <div class="col-lg-6 h-100 text-center text-lg-left my-auto"> <ul class="list-inline mb-2"> <li class="list-inline-item"> <a href="#">About</a> </li> <li class="list-inline-item">⋅</li> <li class="list-inline-item"> <a href="#">Contact</a> </li> <li class="list-inline-item">⋅</li> <li class="list-inline-item"> <a href="#">Terms of Use</a> </li> <li class="list-inline-item">⋅</li> <li class="list-inline-item"> <a href="#">Privacy Policy</a> </li> </ul> <p class="small mb-4 mb-lg-0" style="color: #E6ECF0;">Copyright © 2017 - <?php print date('Y', time());?> <a style="color: #E6ECF0;" href="https://codersmag.com/">CODERSMAG.COM</a> All rights reserved.</p> </div> <div class="col-lg-6 h-100 text-center text-lg-right my-auto"> <ul class="list-inline mb-0"> <li class="list-inline-item mr-3"> <a href="#"> <i class="fab fa-facebook fa-2x fa-fw"></i> </a> </li> <li class="list-inline-item mr-3"> <a href="#"> <i class="fab fa-twitter-square fa-2x fa-fw"></i> </a> </li> <li class="list-inline-item"> <a href="#"> <i class="fab fa-instagram fa-2x fa-fw"></i> </a> </li> </ul> </div> </div> </div> </footer> <!-- Bootstrap core JavaScript --> <script src="https://cdnjs.cloudflare.com/ajax/libs/jquery/3.3.1/jquery.min.js"></script> <script src="https://cdnjs.cloudflare.com/ajax/libs/twitter-bootstrap/4.3.1/js/bootstrap.bundle.min.js"></script> </body> </html> |